Posts : 4772 Join date : 2012-12-01 Location : USA, Texas
Subject: Re: LrdSatyr's Star Destroyer Build (PIC HEAVY) Mon May 22, 2017 9:37 pm
Creative solution using magnets so it isn't permanently glued in place.
LrdSatyr8 Imperial Admiral
Posts : 631 Join date : 2013-01-01 Age : 57 Location : South Carolina
Subject: Re: LrdSatyr's Star Destroyer Build (PIC HEAVY) Tue May 23, 2017 8:17 am
trappedtexan wrote:
Creative solution using magnets so it isn't permanently glued in place.
Magnets have alot of uses in model building these days... wait til you see my next update!
LrdSatyr8 Imperial Admiral
Posts : 631 Join date : 2013-01-01 Age : 57 Location : South Carolina
Subject: Re: LrdSatyr's Star Destroyer Build (PIC HEAVY) Tue May 23, 2017 8:36 am
My shipment of LEDs came last night, so I'm playing around with the engines... will post some progress tomorrrow!
LrdSatyr8 Imperial Admiral
Posts : 631 Join date : 2013-01-01 Age : 57 Location : South Carolina
Subject: Re: LrdSatyr's Star Destroyer Build (PIC HEAVY) Wed May 24, 2017 8:37 am
Well after several days and much squinting, I finally got all the fibers in this beast! I was figuring out just how much I put in there and did some number crunching. I bought 25 feet of 64 strand fiber, and am left with about 6 inches. I cut off roughly 12 inch lengths (eye balling it) and used them throughout the entire ship. That comes to roughly 1,568 feet of fiber or over 5 full football fields in length total! Wow... now I know why my neck hurts!
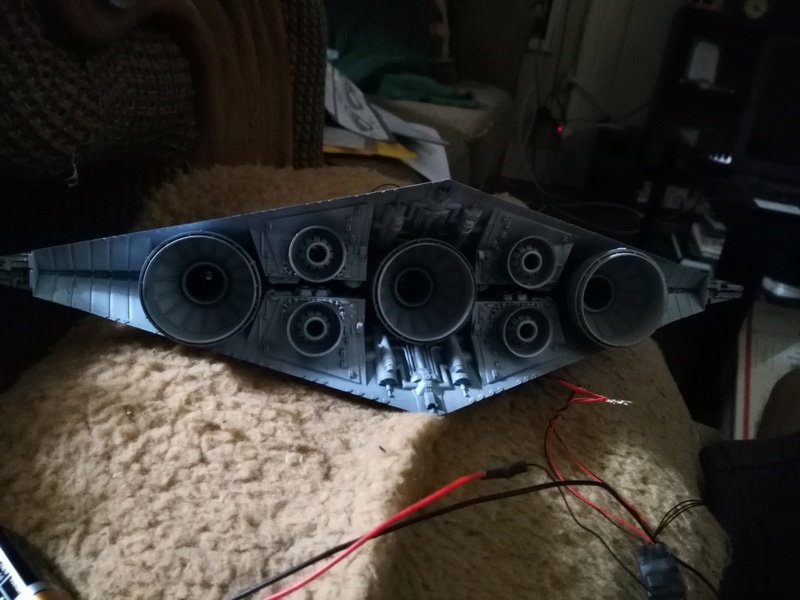
But now that I got my fibers threaded in the thousands of little holes, and my LEDs arrived, I can start working on my electronics. First thing I did was finish up assembling my engine deck...
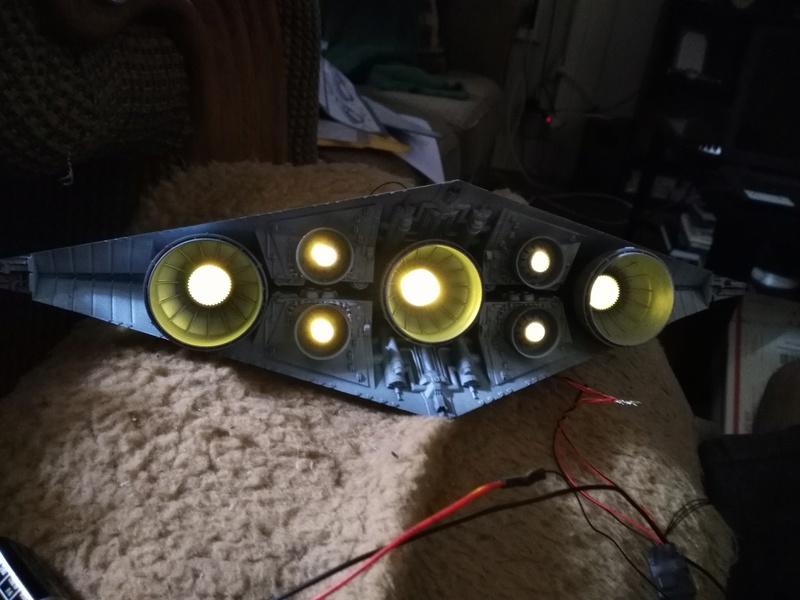
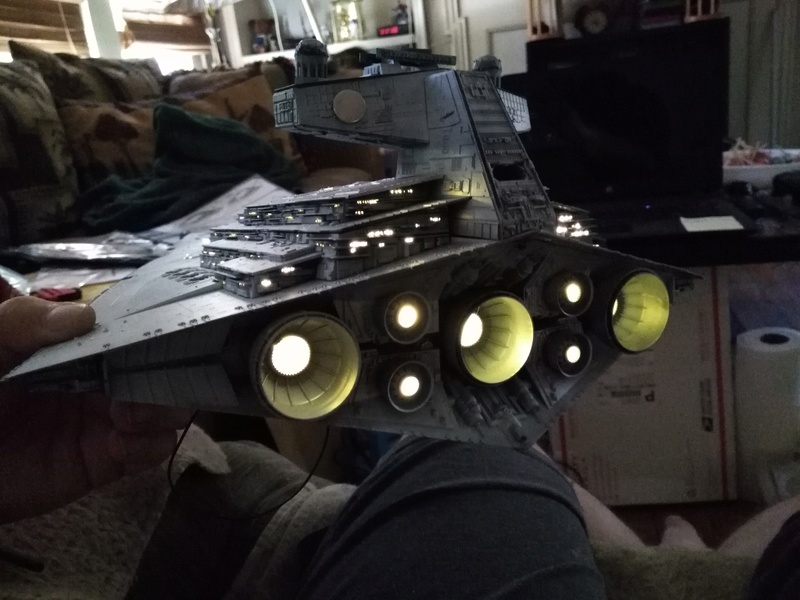
Then, using the seven 1.8mm self flickering LEDs I got, I drilled some holes in the back of each engine and ran the LEDs thru the holes. Hooked them all together (black to black, red to red) and attached them to my remote control unit I got previously. Placed a magnet on my magnet switch, pressed the button on my remote control and magic happened!
Just to give you an idea of just how cool this looks, a photograph doesn't do it justice... the engine lights flicker slightly, giving it a pulsation and making it come to life, so I took a quick video to show just how good they look. You guys tell me what you think...
trappedtexan Moderator
Posts : 4772 Join date : 2012-12-01 Location : USA, Texas
Subject: Re: LrdSatyr's Star Destroyer Build (PIC HEAVY) Wed May 24, 2017 2:24 pm
It's really a neat function. Probably just my opinion but would be cool if the three bigger one kind of pulsated together as it appears the flicker is random and fast.
LrdSatyr8 Imperial Admiral
Posts : 631 Join date : 2013-01-01 Age : 57 Location : South Carolina
Subject: Re: LrdSatyr's Star Destroyer Build (PIC HEAVY) Thu May 25, 2017 2:38 pm
trappedtexan wrote:
It's really a neat function. Probably just my opinion but would be cool if the three bigger one kind of pulsated together as it appears the flicker is random and fast.
Each LED has it's own flicker rate. Make it looks more random and I like the randomness of it, gives it a life all it's own. But that's just my opinion!
LrdSatyr8 Imperial Admiral
Posts : 631 Join date : 2013-01-01 Age : 57 Location : South Carolina
Subject: Re: LrdSatyr's Star Destroyer Build (PIC HEAVY) Thu May 25, 2017 2:59 pm
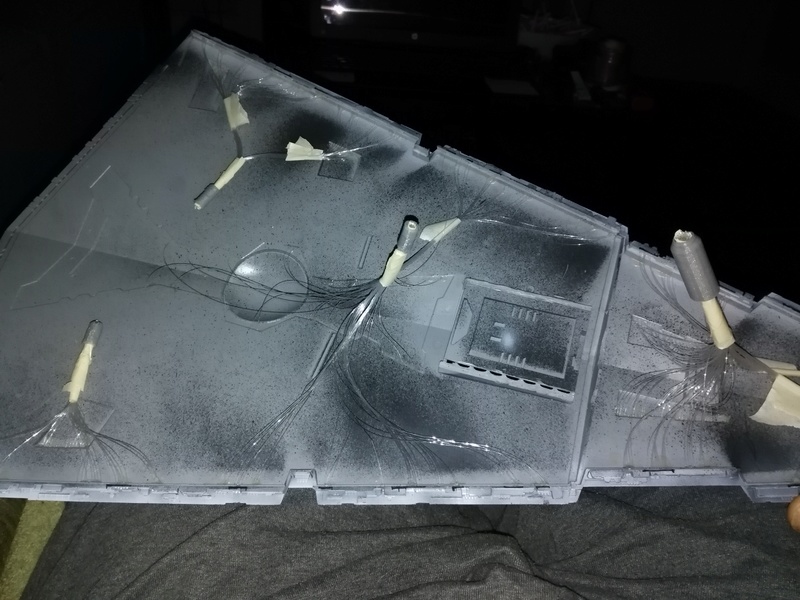
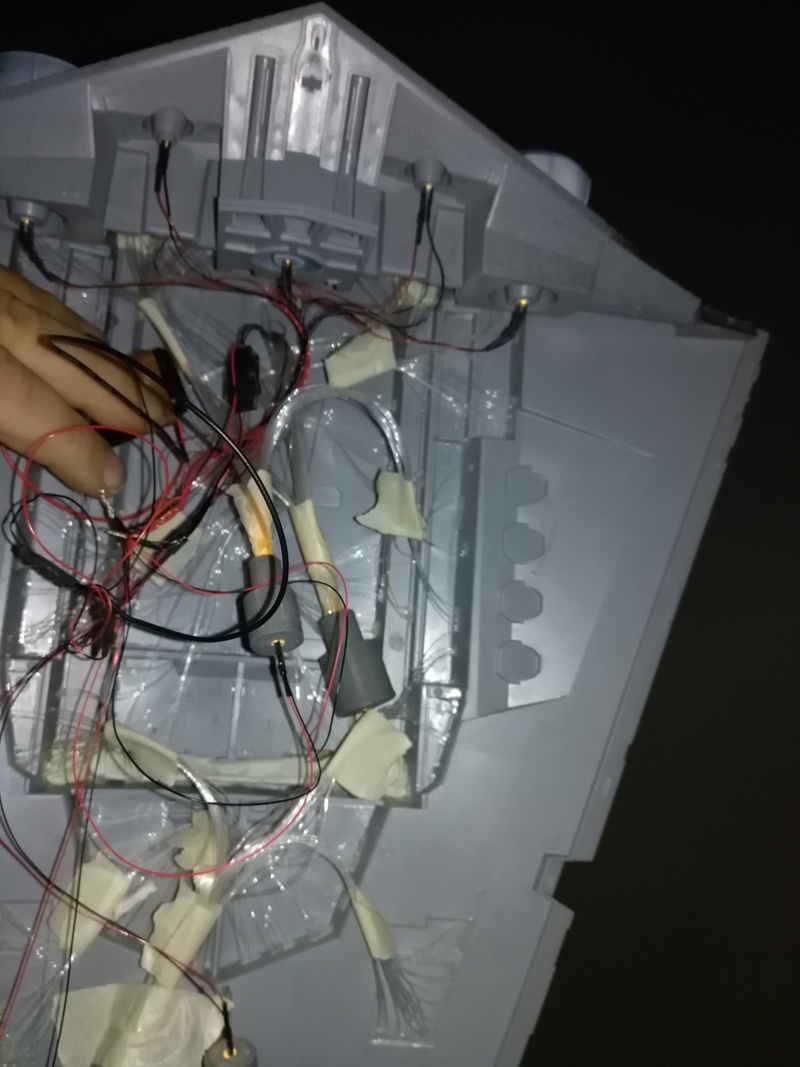
Well last night I spent the night bundling up my fibers and getting them all sorted and grouped. I believe it will take 8 LEDs to light them all (not including the 7 on the engines which would make it a total of 15 LEDs in all).
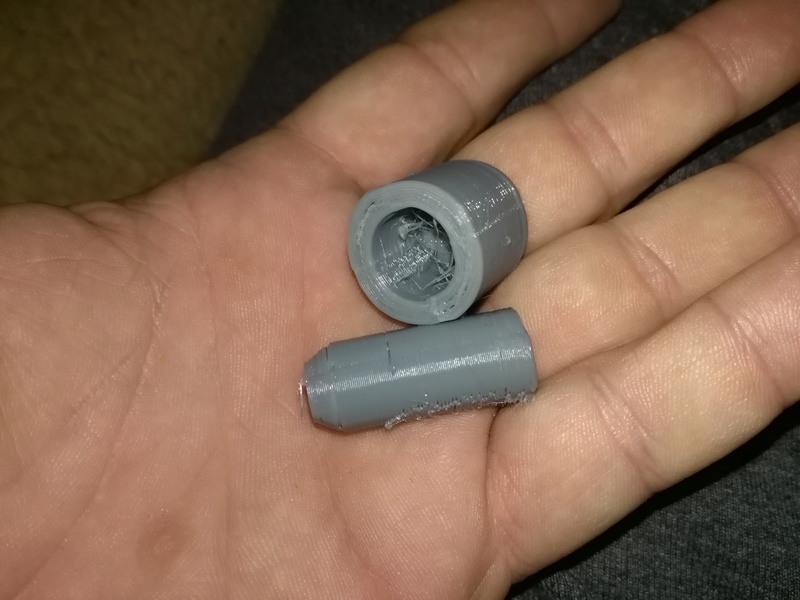
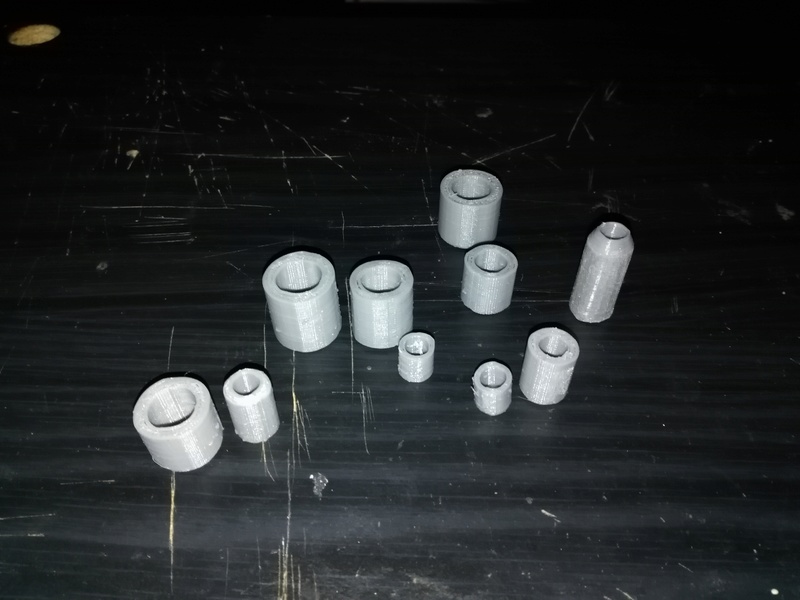
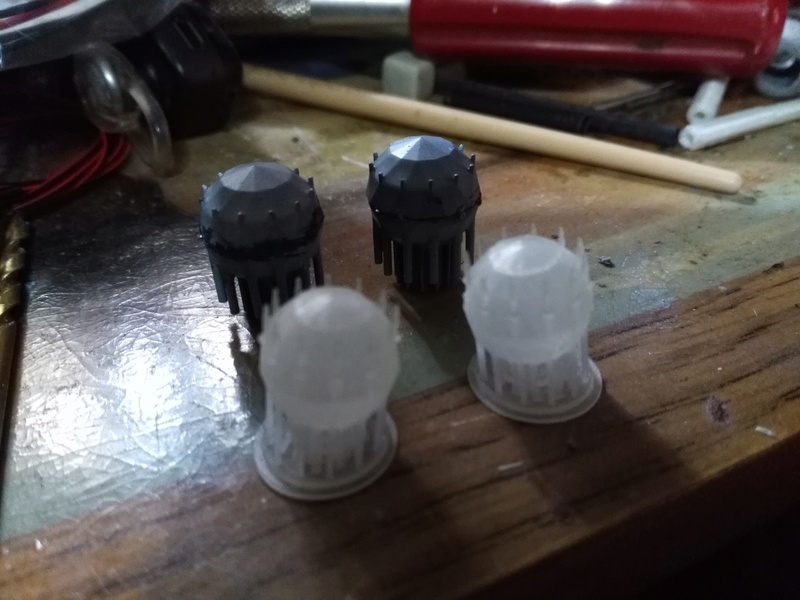
Previously I mentioned these nifty little holders for the fibers and LEDs I made and printed on my 3D printer.
I made them in various sizes because all fiber bundles are not created equally. So I made some big ones and some small ones, I printed about 15-20 different ones total. They are crude (because I don't have the best 3D printer) but they will do for this job!
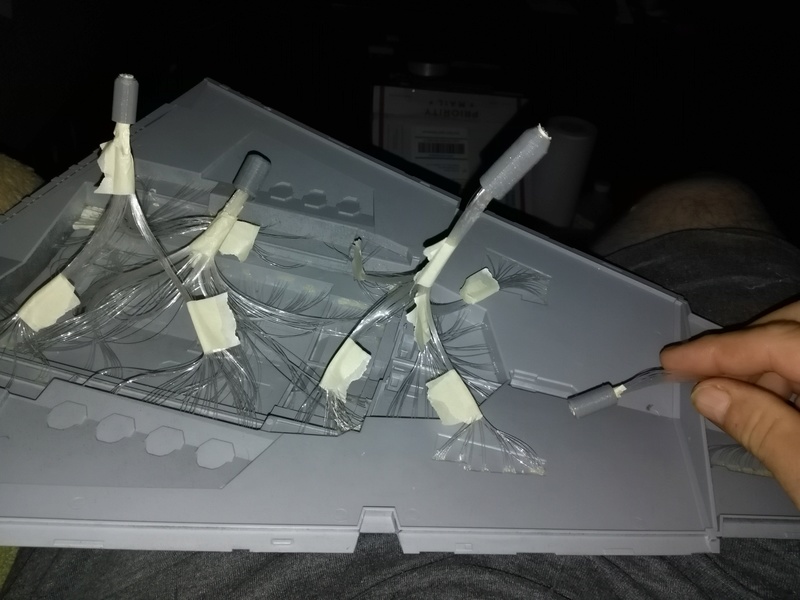
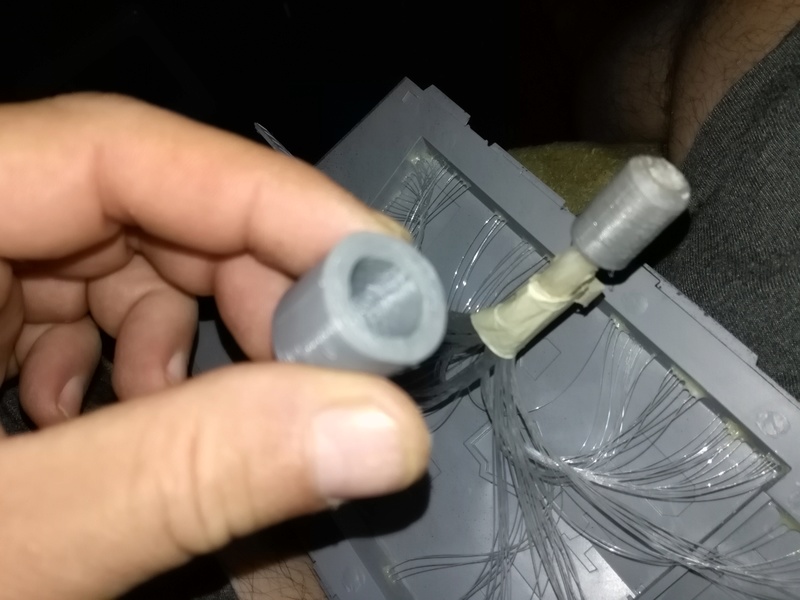
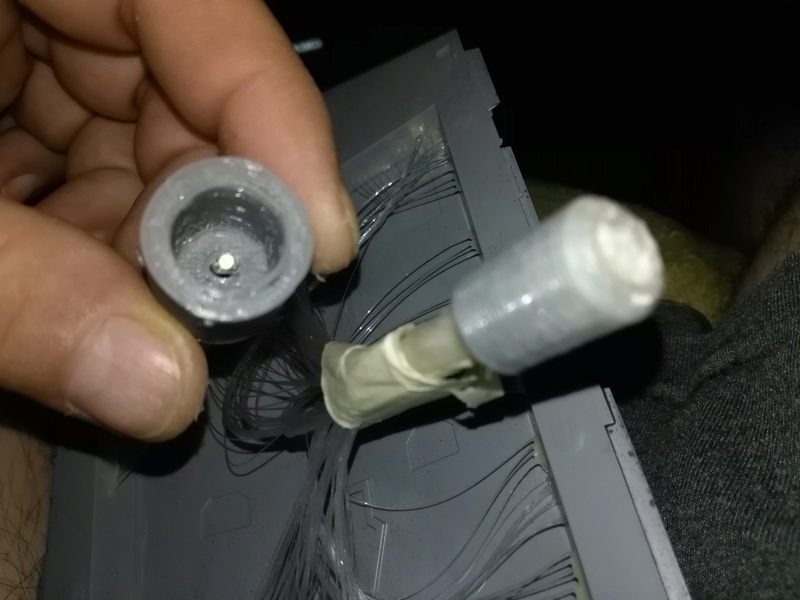
I placed an LED into the bucket end, feeding the wires thru the hole I made in the bottom of each one (if the hole was too small I could always just widen it with a drill bit later). Then I took some masking tape and wrapped all the fiber bundles together and tapered the tape all the way to ends of each bundle. This way I knew I had all the fibers in the bundle. I threaded the tapered end into the tube and pushed the tube down until it was nice and snug. Once the tube was around the bundle, I placed some white glue around the top edge of the tube and twisted the tube around the bundle and lifted it up the bundle slightly to make sure I had glue on the inside around the entire bundle and tube itself. I let that dry and snipped the fiber bundle off as close to the end of the tube as possible.
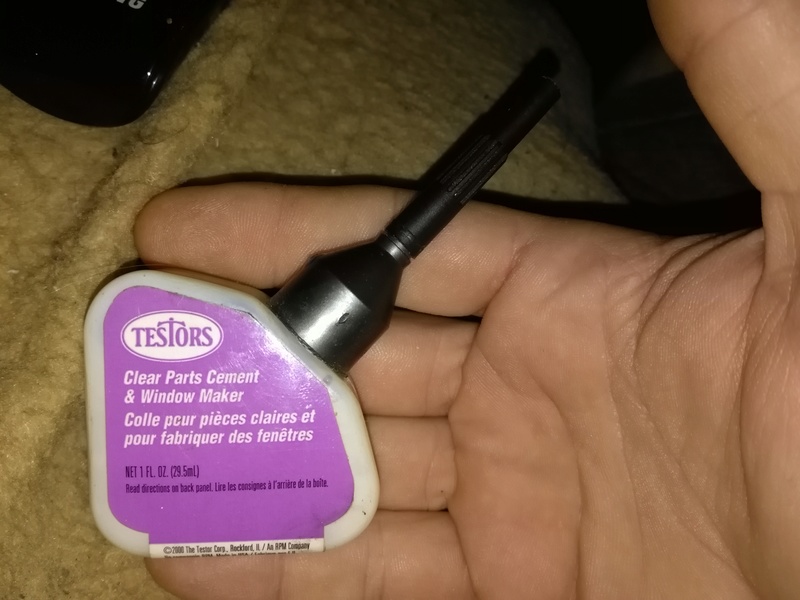
Once I had the fiber tubes in place to increase the diffusion of light and to secure the bundles better, I took some Testor's Clear Part Cement and covered the ends of the fibers and squirted a bit inside the other end of the fiber bundle. This will make the whole thing rock solid!
Once all this is dry, I'll be able to test fit everything and give it a test lighting and see how it comes out. More to come!
trappedtexan Moderator
Posts : 4772 Join date : 2012-12-01 Location : USA, Texas
Subject: Re: LrdSatyr's Star Destroyer Build (PIC HEAVY) Fri May 26, 2017 12:31 am
The glue doesn't interfere with the light in any way? This is shaping up very quickly.
LrdSatyr8 Imperial Admiral
Posts : 631 Join date : 2013-01-01 Age : 57 Location : South Carolina
Subject: Re: LrdSatyr's Star Destroyer Build (PIC HEAVY) Fri May 26, 2017 9:05 am
This glue dries crystal clear unlike the regular white glue that dries kind of cloudy. That's why I am using it here.
ArtooDetour Admin
Posts : 9074 Join date : 2010-03-13
Subject: Re: LrdSatyr's Star Destroyer Build (PIC HEAVY) Sat May 27, 2017 8:03 am
Great updates. How cool is that remote control switch I like the random flicker of the rear but would slow the rate a little. As usual, good working solutions all round and looking top notch!
Kaze Imperial Lieutenant
Posts : 227 Join date : 2010-03-04 Age : 48 Location : Denmark
Subject: Re: LrdSatyr's Star Destroyer Build (PIC HEAVY) Sat May 27, 2017 10:38 am
Im really impressed, great eye for detale
This is very inspirering
LrdSatyr8 Imperial Admiral
Posts : 631 Join date : 2013-01-01 Age : 57 Location : South Carolina
Subject: Re: LrdSatyr's Star Destroyer Build (PIC HEAVY) Sun May 28, 2017 5:04 pm
Artoo_Detour wrote:
Great updates. How cool is that remote control switch I like the random flicker of the rear but would slow the rate a little. As usual, good working solutions all round and looking top notch!
Well the flickering is built into the LEDs so it's not controllable. They are basically the same type of LEDs in those battery operated LED candles. This remote control is a life saver. Really easy to install and use... got so many plans for them in the future! Thanks for the cudos!
Kaze wrote:
Im really impressed, great eye for detale
This is very inspirering
Thank you so much! Glad to be an inspiration!
LrdSatyr8 Imperial Admiral
Posts : 631 Join date : 2013-01-01 Age : 57 Location : South Carolina
Subject: Re: LrdSatyr's Star Destroyer Build (PIC HEAVY) Sun May 28, 2017 5:18 pm
--------------------------- BIG UPDATE ---------------------------
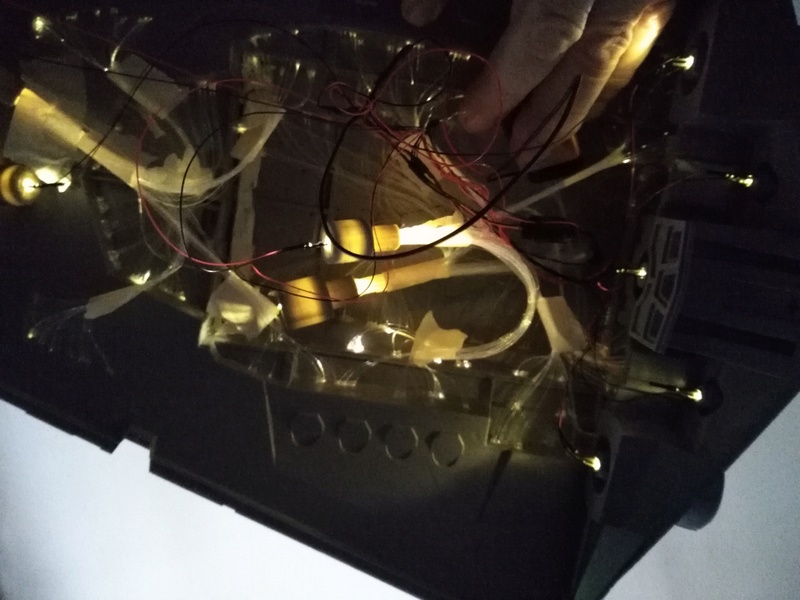
Ok folks... being the holiday weekend, I figured I would get some work done on this puppy... but I am waiting on some LEDs to arrive because I only had 5 solid glow warm whites... so I used four to light up my upper hull and turned it on... my god... I'm in love!
Wiring done... LEDs in place...
Turned it on... and the lighting underneath is surreal!
And this is when the magic happens...
LrdSatyr8 Imperial Admiral
Posts : 631 Join date : 2013-01-01 Age : 57 Location : South Carolina
Subject: Re: LrdSatyr's Star Destroyer Build (PIC HEAVY) Sun May 28, 2017 5:39 pm
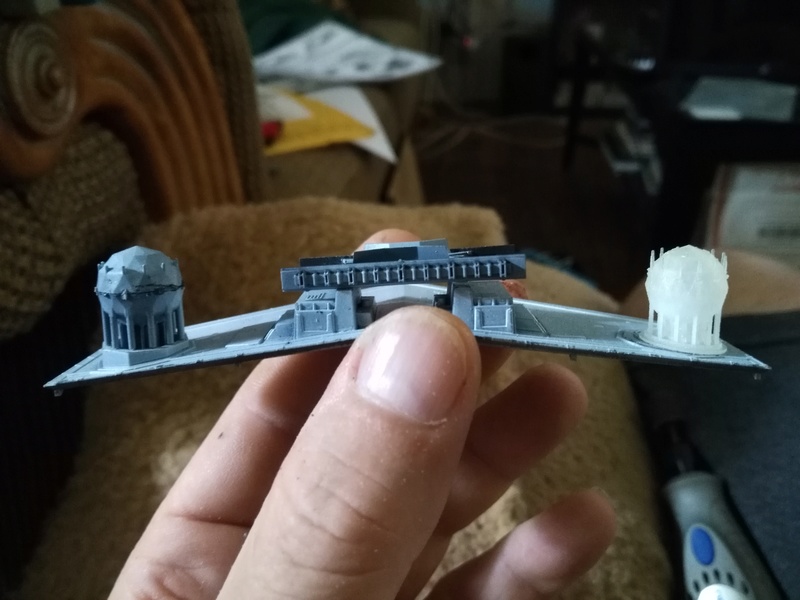
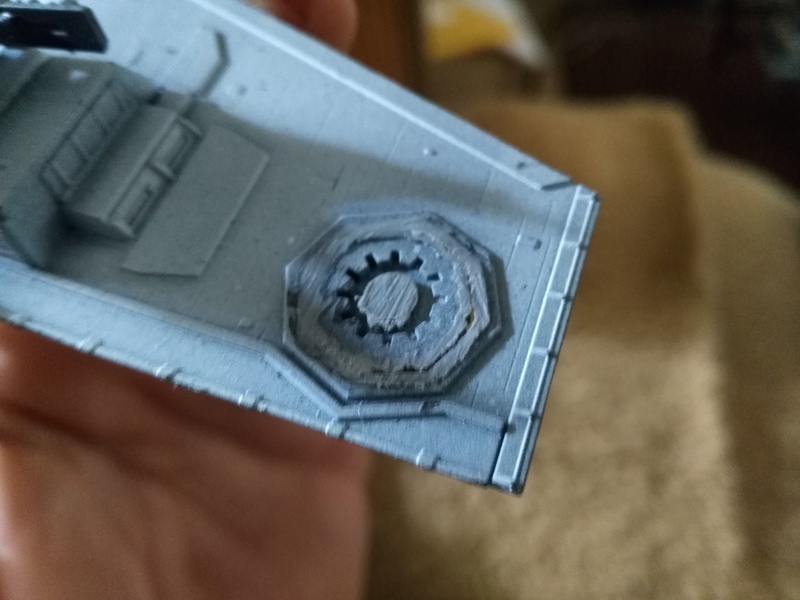
Next up... I got a couple of cool parts from Shapeways that I wanted to include in this build. First up... the Radar Domes on the top. Here's a comparison of the Shapeways domes and the kit domes. The Shapeways domes look much more realistic and closer to the actual filming model.
So I took my dremal out and sanded down the raised area where they dome should go on one side to give a more accurate comparison (note... I haven't detailed the paint job on the kit dome so it looks kinda horrid, but this is basically a good shape test).
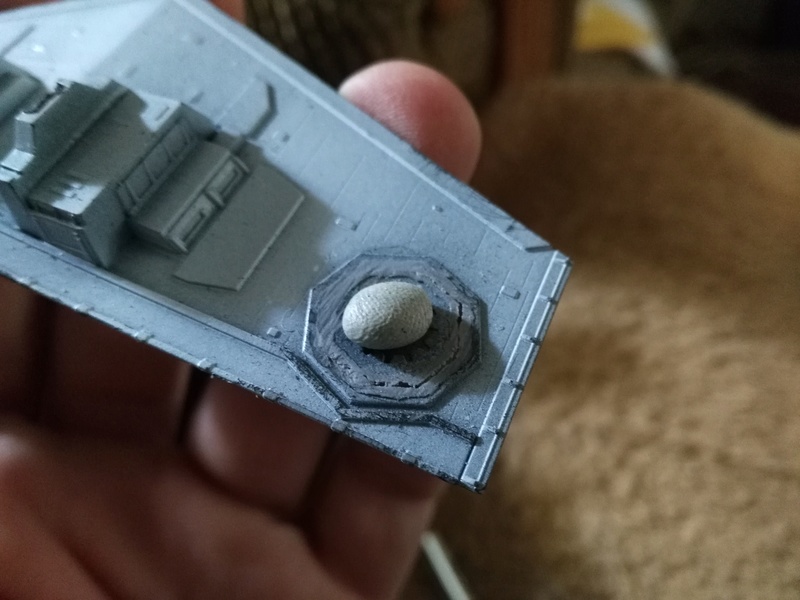
Oh yeah... loving this look... I sanded down the other side even with the hull, but I kinda like the hexagon look of the platform, so to preserve it I took some putty, mashed it into the platform, and smoothed it out. Then I glued the domes in place.
Oh yeah... much better looking... so now I just gotta paint it... this is the fun part!
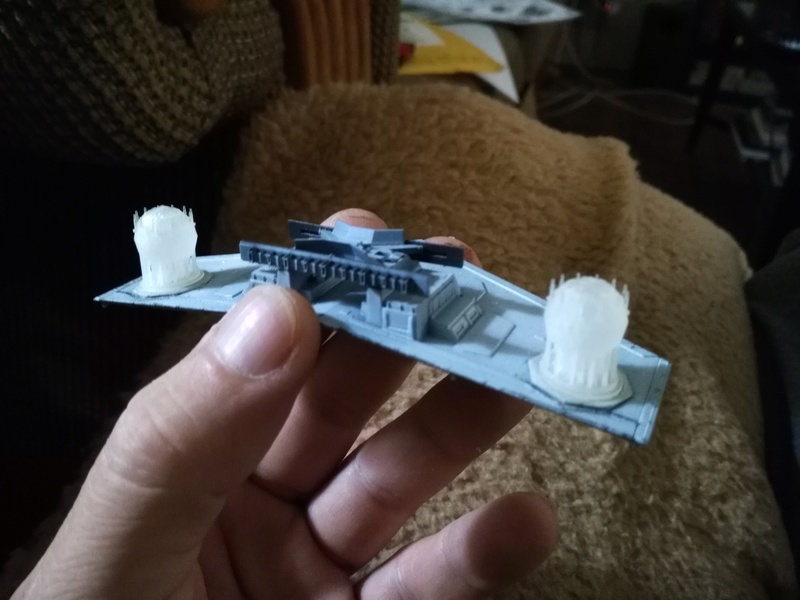
Oh yeah baby... that's what I'm talking about! I did mention I got more then one piece right? Here's what else I got...
More to come!
LrdSatyr8 Imperial Admiral
Posts : 631 Join date : 2013-01-01 Age : 57 Location : South Carolina
Subject: Re: LrdSatyr's Star Destroyer Build (PIC HEAVY) Sun May 28, 2017 5:47 pm
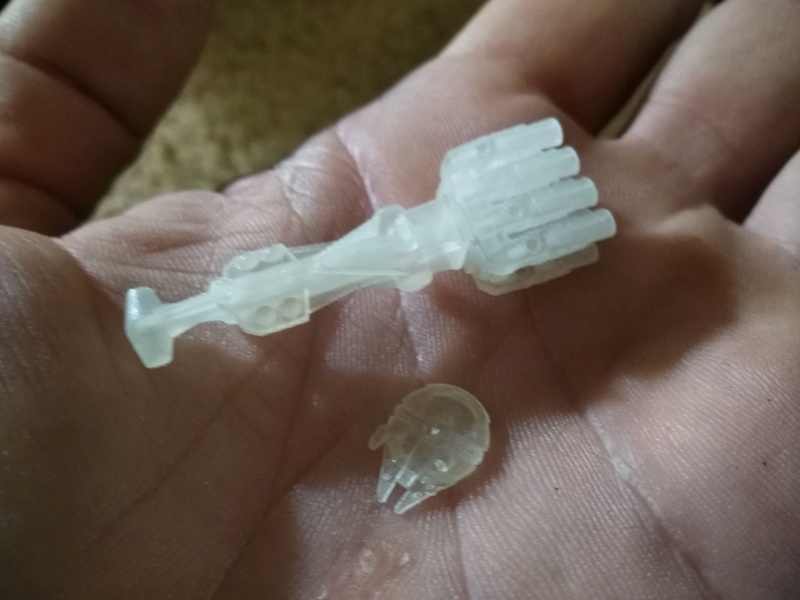
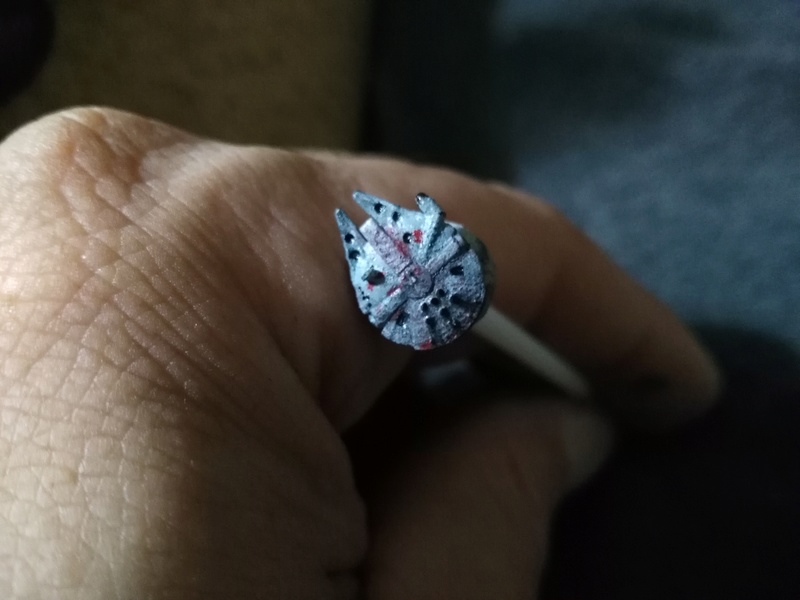
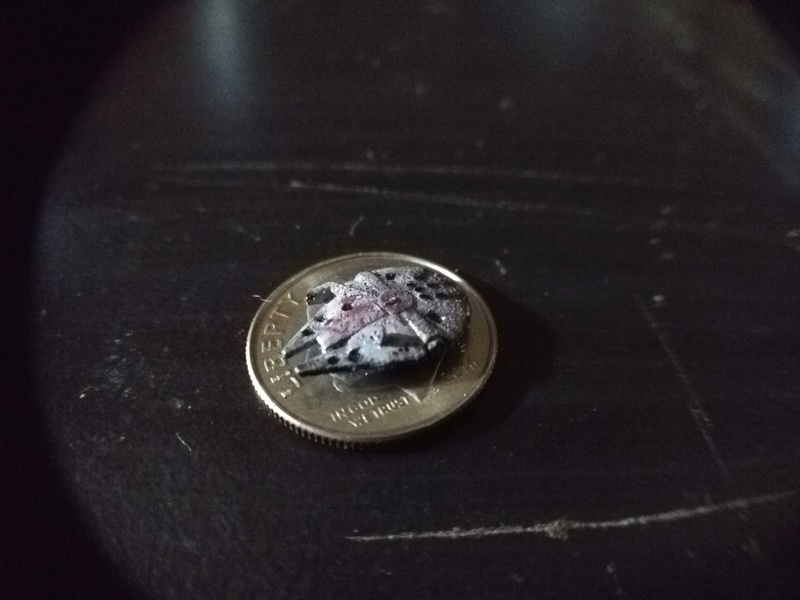
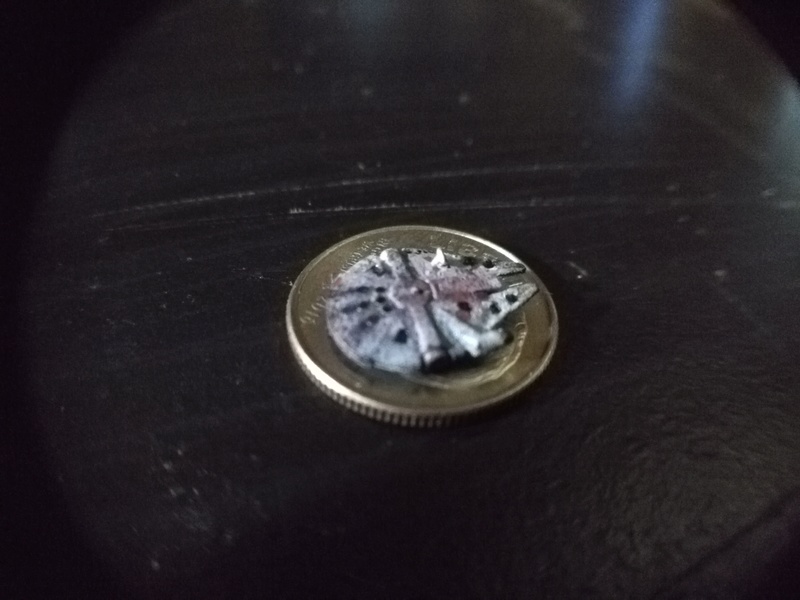
Of course you know I had to paint a Falcon! This thing is tiny! I think I went cross eyed trying to paint it, but I think it came out looking pretty good... what do you all think?
Yes that is a DIME!
Of course I had to paint the corvette too! Things are progressing quickly now!
LrdSatyr8 Imperial Admiral
Posts : 631 Join date : 2013-01-01 Age : 57 Location : South Carolina
Subject: Re: LrdSatyr's Star Destroyer Build (PIC HEAVY) Sun May 28, 2017 6:28 pm
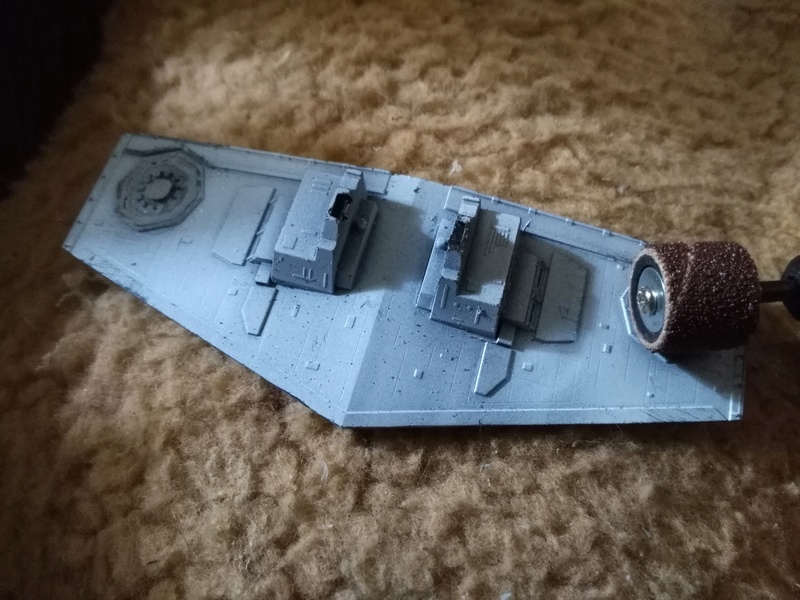
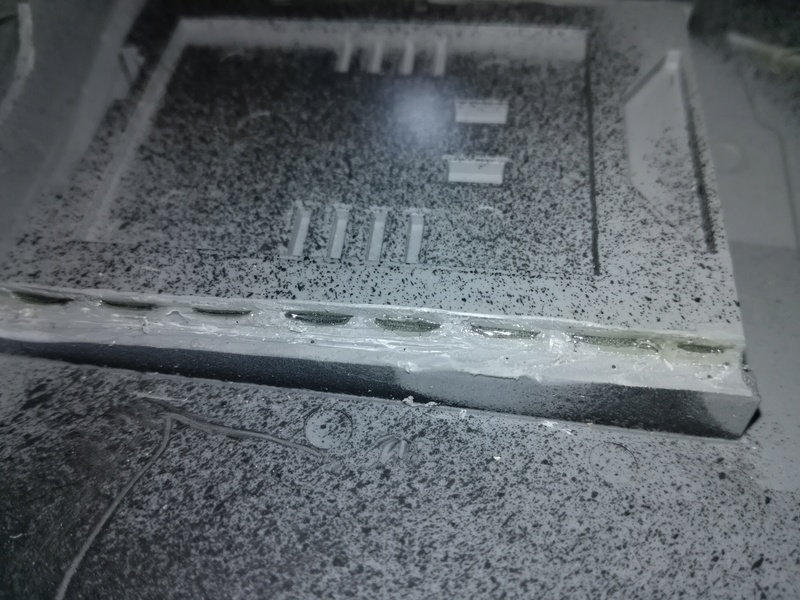
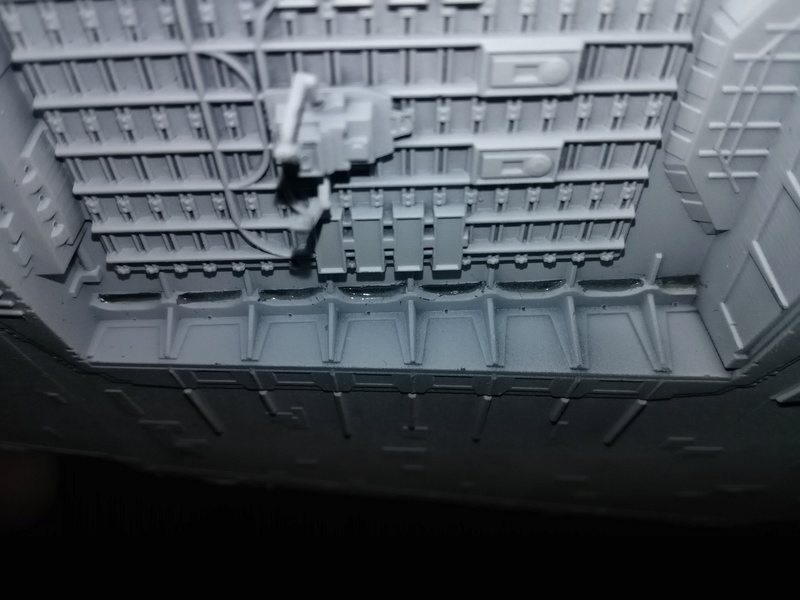
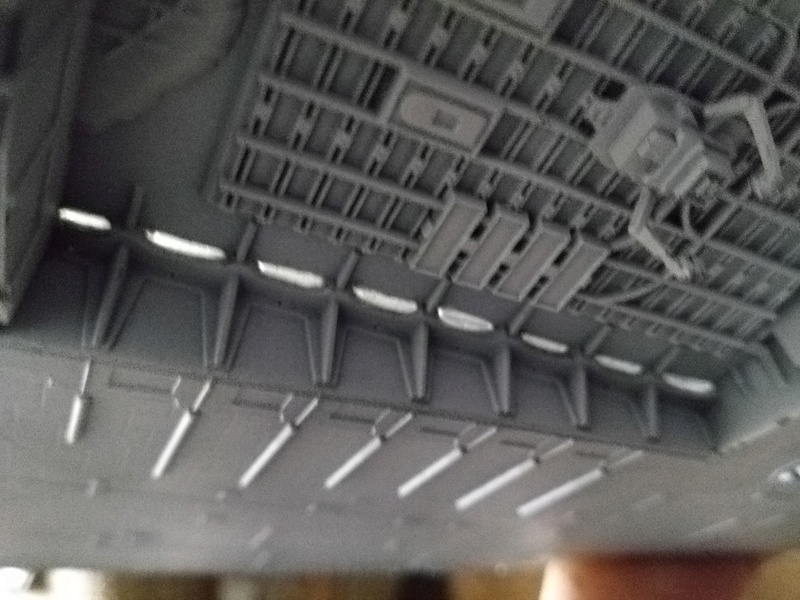
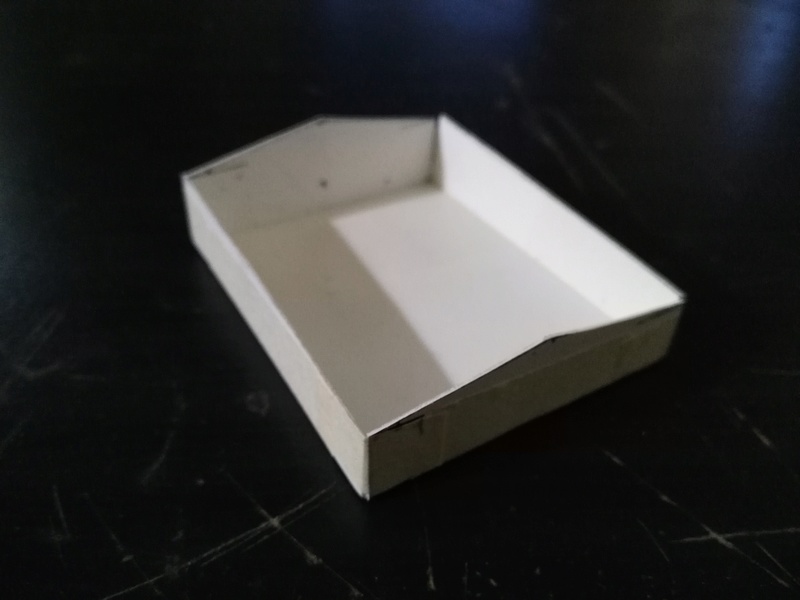
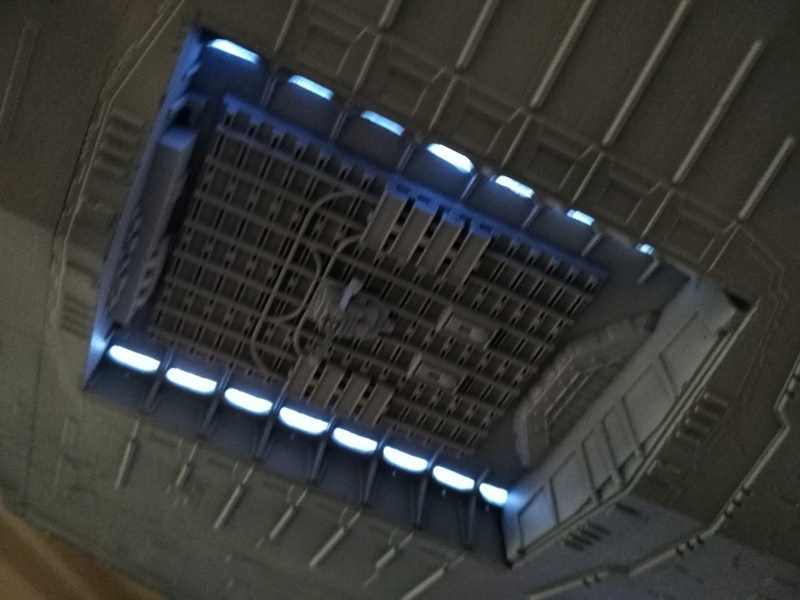
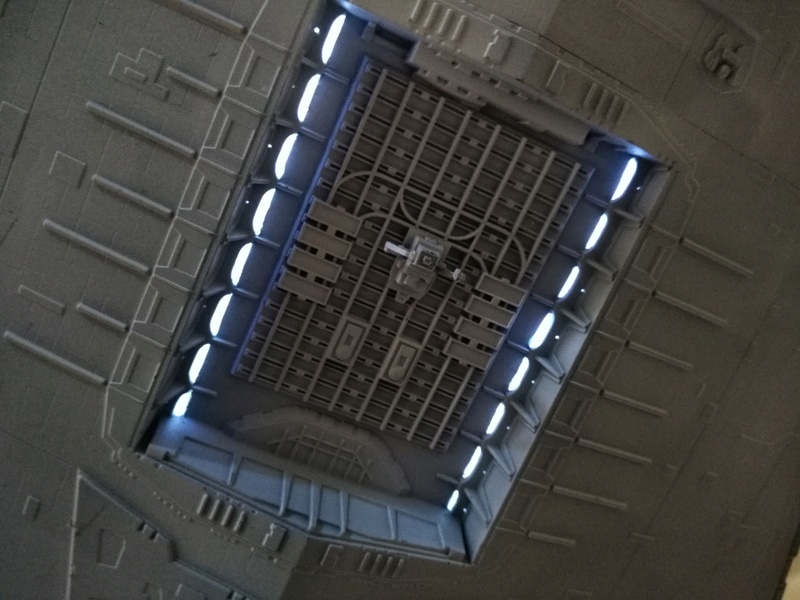
I've been watching alot of other people building this kit and I'm amazed at how convoluted they make it. The one thing that shouldn't be that difficult is lighting the lower bay. I've seen people using light strip, multiple LEDs and EL wire to light it. I'm thinking I could probably do it with a single LED. Here's how I did it... first I needed to sand down the edges along the inside edge of the bay to get to the cresent shaped windows and cut them out using a hobby knife.
Then I used my clear parts cement and filled in the holes I made to make "windows".
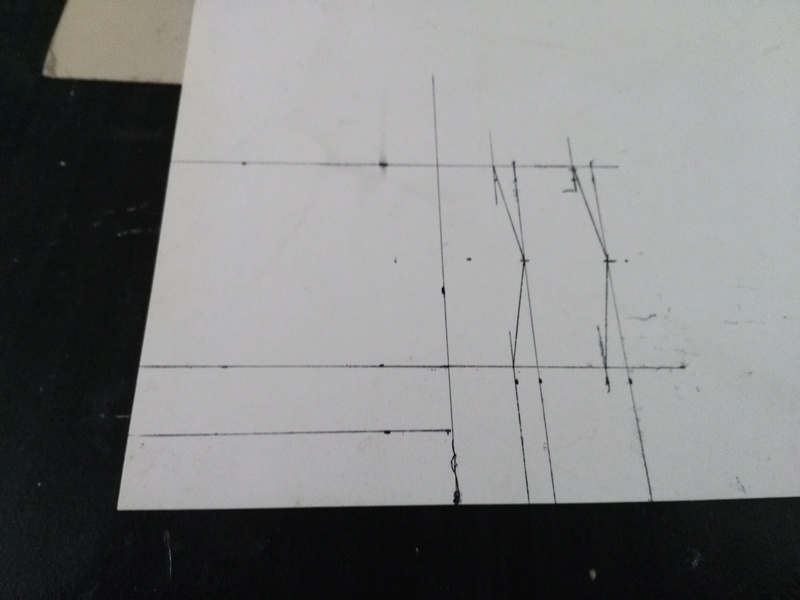
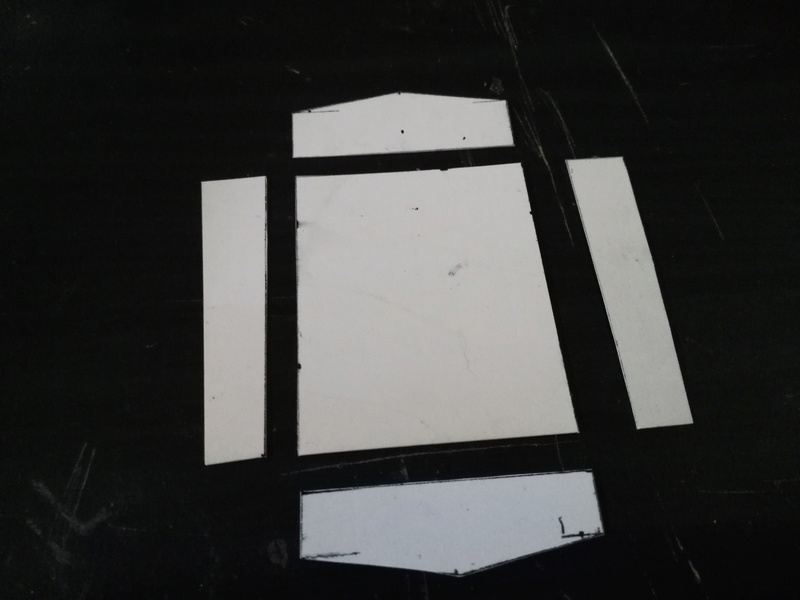
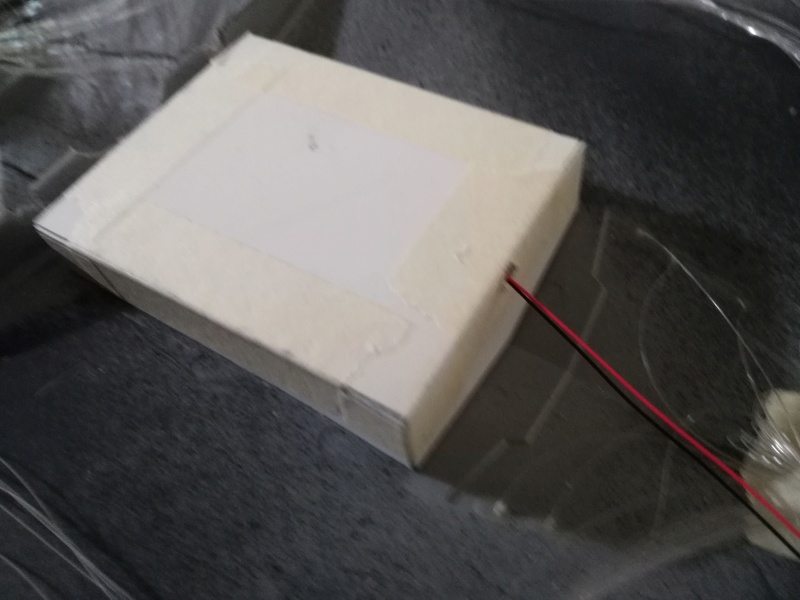
Then I measured the bay from the inside and drew out the measurements on a piece of styrene. I cut the styrene out and taped and glued the pieces together.
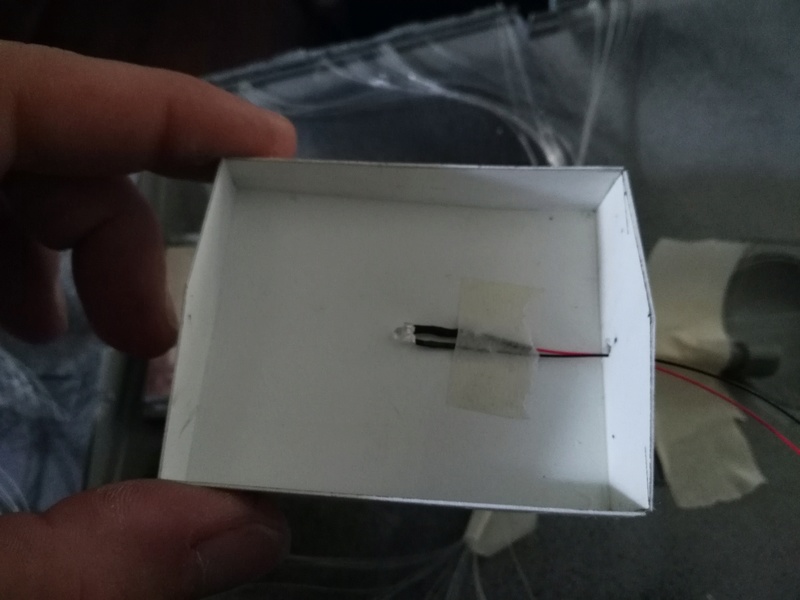
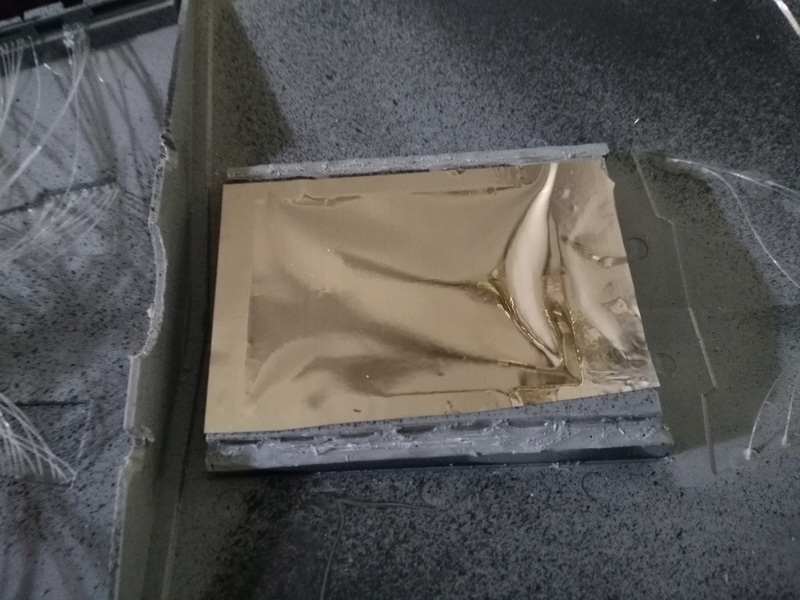
Then I drilled a hole in the end, and taped a single LED in the center. I used some Aluminum tape on the top of the bay and placed the "box" over the top of the bay.
I wired the light to a battery and turned it on...
and viola...
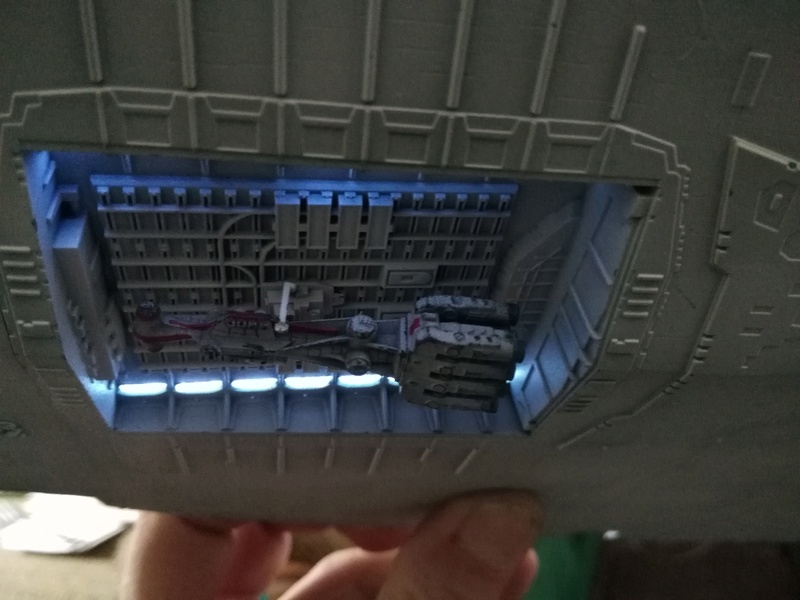
perfectly diffused and ratio proportionate lighting in the lower bay! I drilled a couple of holes under the windows to act as lights the effect looks glorious. I couldn't help but put the corvette in the crane clamp!
There'll be no escape for the princess this time...we're doomed! More to come my friends!
trappedtexan Moderator
Posts : 4772 Join date : 2012-12-01 Location : USA, Texas
Subject: Re: LrdSatyr's Star Destroyer Build (PIC HEAVY) Sun May 28, 2017 10:49 pm
Wow, stunning details in the small falcon and the shape says stuff. Love the lighting of the bay and it looks fantastic. I do wonder if maybe it is the camera or what but the top lighting almost looks to bright. Instead of seeing each tip of the threads as in individual light, many of them look like large blocks of light all together.
LrdSatyr8 Imperial Admiral
Posts : 631 Join date : 2013-01-01 Age : 57 Location : South Carolina
Subject: Re: LrdSatyr's Star Destroyer Build (PIC HEAVY) Tue Jun 13, 2017 2:33 pm
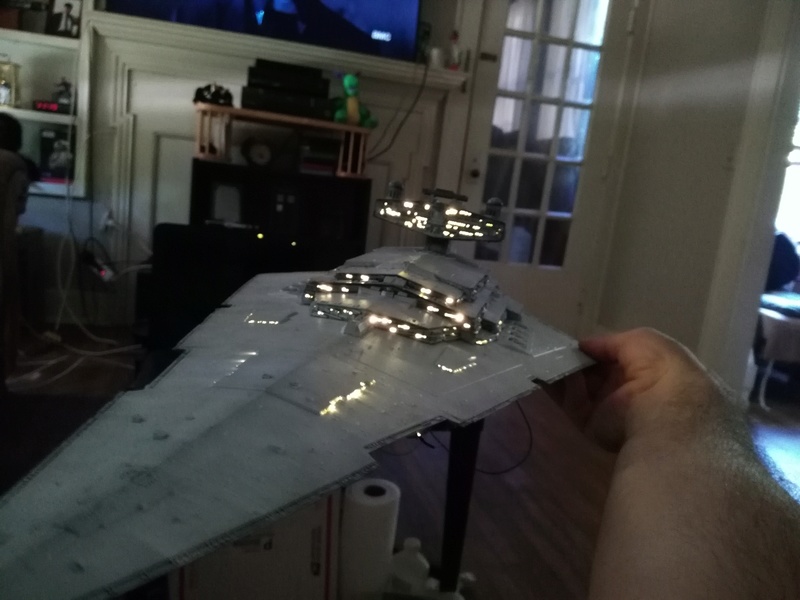
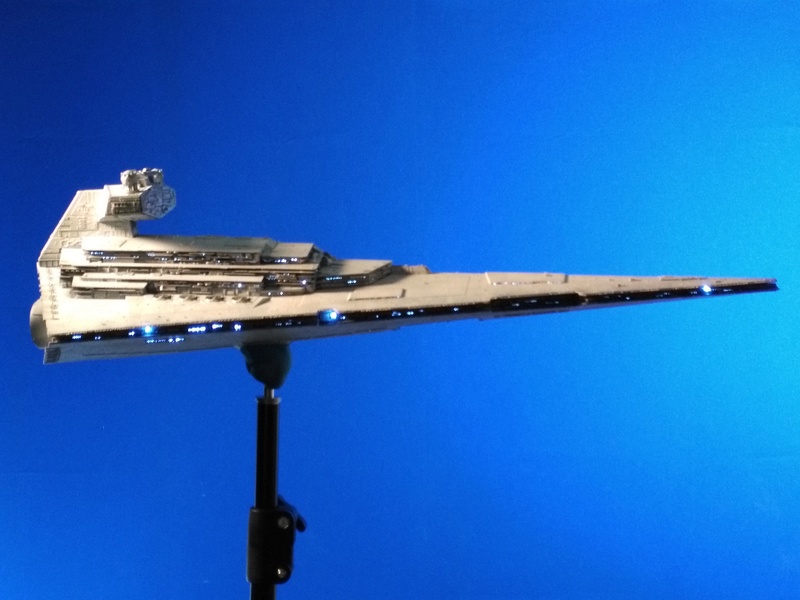
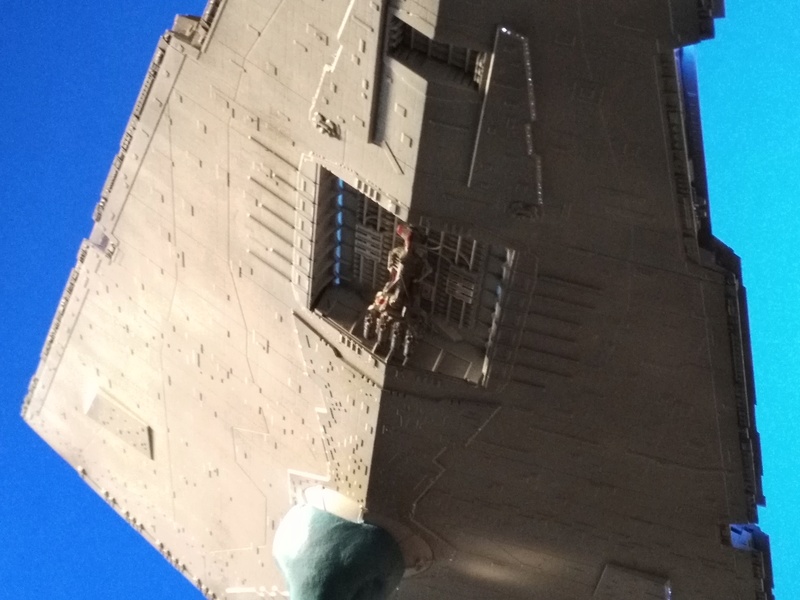
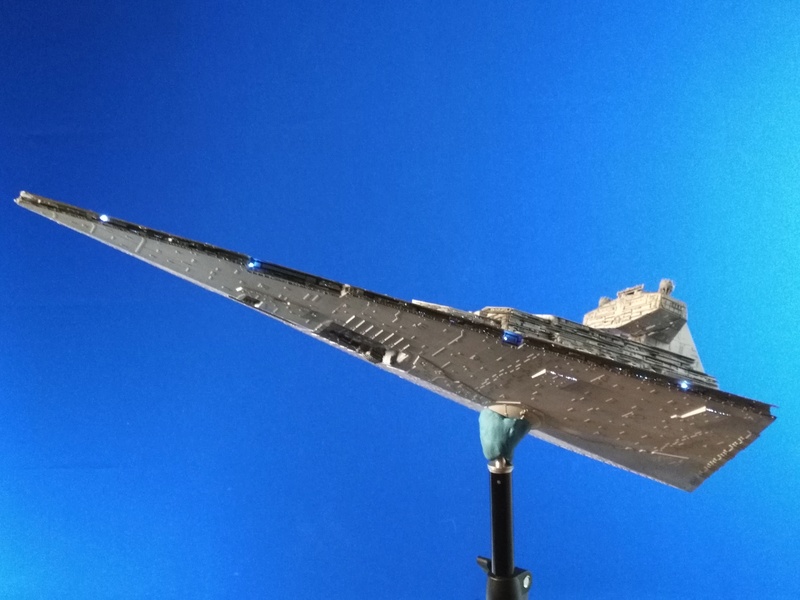
I just realized... I haven't posted any completed photos yet! Yes... I finished it... I guess it's done at least. I still may go back in and change out the blue fiber LEDs for the warm white ones. Make it look more authentic. I haven't glued the top and bottom hulls together yet, but it's generally completed! A friend in the UK wants me to take some video of it for a short movie he's making. So all these pics are from my photo shoot with my cell phone (still working on some better pics) but these should wet your appetite! I mounted it on a tripod stand with some blutac. Still debating on weather I should drill a hole in the bottom for mounting it or not. Would love some feedback from everyone!
Lemme know what you all think? Should I switch to the warm whites or leave the windows the cool white instead? I'm working on some more photos when my new camera gets here... as well as some vids. Gonna see what kinda trouble I can do with this thing! Muahahhaahahahaha! Stay tuned for more!
trappedtexan Moderator
Posts : 4772 Join date : 2012-12-01 Location : USA, Texas
Subject: Re: LrdSatyr's Star Destroyer Build (PIC HEAVY) Tue Jun 13, 2017 10:45 pm
What a pile of....just kidding.
My opinion, don't put a permanent stand on it. If your gonna use this for some sort of photography or do cenimatography then you may want to be able to tilt it or flip it to see the underside more clearly or any number of things. Attaching it to a stand limits options. As far as the lights go, with the warm lights for the engines it gives a nice contrast to the cool lights on the body. To me I would leave it as I like the current look a lot.
Sponsored content
Subject: Re: LrdSatyr's Star Destroyer Build (PIC HEAVY)