Posts : 631 Join date : 2013-01-01 Age : 57 Location : South Carolina
Subject: Eaglemoss Ecto-1 Build Wed Jul 01, 2020 9:58 am
OK all... I couldn't resist... I had to get this and its going to be another monster! Check this out...
Yes this is a real thing and I gotta tell ya... it's a gorgeous thing. I know... I know... I haven't finished my Falcon yet, but I couldn't resist this beauty! Not only is it 1:8th scale meaning that when complete it will be over 3 feet long... but... All the doors open, all the lights work, all the windows roll down with the handles, comes with all the proton packs, gurney, instruments inside, sound effects (including the siren), brake lights come on when you press the brake pedal and the steering wheel turns the wheels... I mean who wouldn't want this thing!
But like all models like this, they all haven't their flaws. The first one I spotted was this... the License Plate. For some reason they used a screen grab of the movie and didn't take into account that the plate itself was partially obscured by the chrome bumper... and they made the plate without the border going all the way around it. So of course I had to fix that problem straight away with my new resin printer
I'm sure I'll find more as I get more parts in... but this is what I've got going on right now! Lemme know what you think!
trappedtexan Moderator
Posts : 4772 Join date : 2012-12-01 Location : USA, Texas
Subject: Re: Eaglemoss Ecto-1 Build Sat Jul 18, 2020 11:19 am
Another epic build started....waiting to see what bells and whistles you add here. I know there is no way you will just go with the kit alone. Already a new license plate and you haven't even started yet. Ha ha ha
LrdSatyr8 Imperial Admiral
Posts : 631 Join date : 2013-01-01 Age : 57 Location : South Carolina
Well I got my 4 proton packs and immediately jumped into them. I get 4 packs a trap and a foot pedal. So... I threw one together real quick... The details were nice, I loved the fact that the labels were actually on the pack pre-painted there... no glue required...
Stock build straight out of the box.
However I took a look at the actual pack and immediately noticed alot of little details it was missing...
Movie used full size prop.
First up, there's no way to attach the wands to the pack itself. I mean really? They couldn't have put a pin and hole there? So... I designed an authentic V-Hook and 3D printed them up on my new resin 3D printer.
I took the long part and glued it to the wand... and the block and glued it to the side of the pack...
After allowing the glue to set and cure completely I tried it out...
Fits like a glove!!! More to come!
Last edited by LrdSatyr8 on Wed Aug 19, 2020 1:09 pm; edited 1 time in total
LrdSatyr8 Imperial Admiral
Posts : 631 Join date : 2013-01-01 Age : 57 Location : South Carolina
Subject: Re: Eaglemoss Ecto-1 Build Wed Aug 19, 2020 11:17 am
I put the V-Hooks up on Shapeways for anyone that would like to put them on their packs.
Eaglemoss Ecto-1 GB Proton Pack V-Hooks
LrdSatyr8 Imperial Admiral
Posts : 631 Join date : 2013-01-01 Age : 57 Location : South Carolina
Subject: Re: Eaglemoss Ecto-1 Build Wed Aug 19, 2020 11:36 am
Next up... comparing the packs with the actual packs, I spotted even more differences.
Kit Pack with no mods straight out of the box build
Original Pack from the movie
The first most glaring difference is the pack is missing the ribbon cable. Got a little reference of the colors of the ribbon cable to start with...
So after taking some advice from others, I went to Walmart and picked up some needlepoint thread and attempted to match the colors the best I could. I laid them down on a piece of card and then applied some white glue over the top of them and allowed it to dry completely and what do you know... a nicely colored and semi-accurate ribbon cable.
I cut a length of it and glued it in place. I used a twist tie to bind it and glued that down on the ladder.
That looks alot better already! But of course... I can never leave it there... I spotted even more problems! More to come!
Last edited by LrdSatyr8 on Wed Aug 19, 2020 1:06 pm; edited 1 time in total
LrdSatyr8 Imperial Admiral
Posts : 631 Join date : 2013-01-01 Age : 57 Location : South Carolina
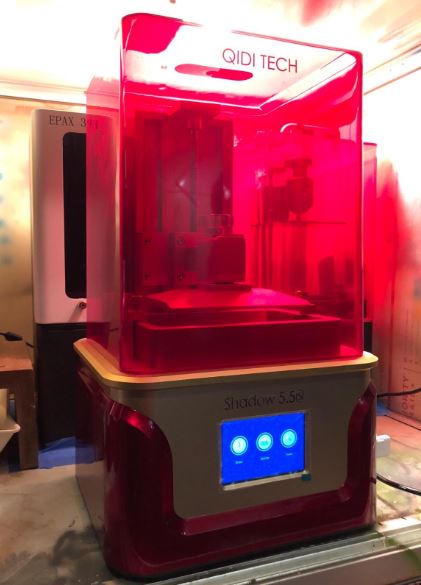
I've been 3D designing and printing for many years now, but I just took a leap forward and bought a resin printer. I've been dealing with PLA Filament printers for awhile. They are good but just can't get the resolution or the details that a good resin printer can. The one I got was a QIDI Shadow 5.5s... this thing looks like Tony Stark made it but it was only $185 so I really couldn't pass it up.
You can get it here: QIDI TECH Shadow 5.5s 3D Resin Printer
The biggest difference between a PLA FDM printer and a Resin printer is that a FDM printer uses a filament of plastic (like weed eater string) and forces it into a hot end with a nozzle that has a little hole in it (think of a hot glue gun only the hole is alot smaller and this is all automatic). All while moving this hot tip around on a flat surface and it builds up the 3D object. However, a Resin printer uses a photo-sensative liquid resin that hardens when exposed to UV light. It's placed in a vat, and cured from the bottom. Each layer is built up by lifting a bit and exposing the next layer. But the real difference is that with an FDM printer you have a resolution of 0.4mm (which when making detail parts is pretty big)... whereas with a resin printer you can get a resolution of 0.04mm (100x smaller detail!). So of course at this scale I needed much more detail. To show the process, I printed up a batch of my V-Hooks I made earlier!
As you can see here I can print multiple objects at once (this is a batch of 12 sets). All 24 pieces only took 10 minutes to print. It's fast, but then again, they are small parts! Next... the clean up...
The parts are scraped off the build platform and then rinsed off in IPA Alcohol... then rinsed in clean water and allowed to dry. I picked up this nice little set of UV light and rotating platform from Amazon for $20...
UV Resin Curing Light and Solar Turntable
I placed the parts on the platform and turned the light on. Left it there to fully harden the resin for about 5 minutes.
I could have just set it up outside in the sun, but it's cloudy and unreliable. When done the parts are fully cured and ready to be painted. It's a totally different process from the FDM printers, but you cannot argue with the resolution and the detail these things print. I'm loving it!
More to come...
LrdSatyr8 Imperial Admiral
Posts : 631 Join date : 2013-01-01 Age : 57 Location : South Carolina
Next thing I noticed is that the hoses just didn't look right, and that's because on the stock pack, it's missing hookup connectors (resistors) on the rod arm. That's blue hose shouldn't go around the top like that, it's suppose to connect to qa nut on the top of the pack and thru a hose connector on the inside of the arm. Then a yellow hose should connect from the bottom to the outside of the arm. What to do? Guess I'll just have to make my own parts for it! So I came up with 3 different parts to fix the problem...
Needless to say these things are tiny... but that top nut has to be brass, so I had to paint it...
Once done I glued them in place. The long blue hose that was wrapped around the top, I cut and painted the shorter hose yellow. I fed the longer hose thru the connector on the inside (it was a tight fit but it slid all the way thru, then glued it into the brass nut on the top.
The shorter hose I glued into the bottom of the connector on the outside.
When everything dried it looked a helluva lot better then before. What do you think?
More to come...
LrdSatyr8 Imperial Admiral
Posts : 631 Join date : 2013-01-01 Age : 57 Location : South Carolina
I added a some more weathering to the pack, and noticed the brass ION bar shouldn't be sticking up as far on top, so I snipped it off. I also added the red wire on the wand. So I took a few glamour shots...
Now it's onto the back and the Alice frame with straps... More to come!
trappedtexan Moderator
Posts : 4772 Join date : 2012-12-01 Location : USA, Texas
Man this is gonna be another incredibly detailed model I think. That ribbon hose or whatever connect to a white connector at the pack in the pics are you gonna paint that piece? Also the 4 red circles on the model are bright as though the pack is "on" or something. Assuming because the model maker wanted that red to stand out but since the pack isn't being used it shouldn't be bright like it is glowing right?
LrdSatyr8 Imperial Admiral
Posts : 631 Join date : 2013-01-01 Age : 57 Location : South Carolina
Subject: Re: Eaglemoss Ecto-1 Build Sun Aug 23, 2020 8:12 am
trappedtexan wrote:
Man this is gonna be another incredibly detailed model I think. That ribbon hose or whatever connect to a white connector at the pack in the pics are you gonna paint that piece? Also the 4 red circles on the model are bright as though the pack is "on" or something. Assuming because the model maker wanted that red to stand out but since the pack isn't being used it shouldn't be bright like it is glowing right?
The ribbon cable is suppose to be that way. Look at the reference pic above. As for the red "lights" on the cyclotron, that's normal too. They are suppose to be red transparent glass, but at this scale actually lighting them up would be a nightmare. I don't think ill be lighting them because ultimately they will be going into the back of the Ecto on the gurney in non-operating mode.
LrdSatyr8 Imperial Admiral
Posts : 631 Join date : 2013-01-01 Age : 57 Location : South Carolina